Thursday, January 30, 2014

Innovative Art Displays


There are many innovative, (and unconventional) ways to display art. 

Such as this one. I love the simplicity; each piece is matted to match the artwork. Attaching it to white foam core boards keeps it uniform. 


You can display art creatively on any budget; using protectors sleeves that have a solid background.


Have a hard time gauging how much space you need? Lay it out on the floor first.


I love this one. Can you see why?


What other ways do you display art?

Sunday, January 26, 2014

DIY Valentine Boxes

Favorite Valentine Boxes

I love to see kids creativity when designing their own Valentine boxes. This one is my daughter's. Isn't she cute?

Made from empty Kleenex boxes, egg carton, googly eyes, glitter paper, pink wrapping paper, black construction paper for eyelashes.

Big Lip Valentine Box
How about this Valentine mailbox, available at Target.

Valentine Mailbox from Friskars

This one is just purrfect, if you ask me!

Scrap Reused and Recycled Art Projects.

...and for the kids who love to play with Legos.

The Pretty Poppy 1
With so many choices, it will be hard to decide. Have fun creating!

Thursday, January 23, 2014

Homemade Granola

I love granola and until recently have always bought it at Costco. I didn't realize how easy it was to make your own; until my friend Gayle shared her recipe with me!


Homemade Granola

I am happy to pass on the recipe to you! Here's my version of her recipe:

3 cups old fashion oats
1 cup flaked coconut
1 cup *each walnuts, almonds, pecans, dried tart cherries
1/2 cup butter
1/2 1/4 cup canola oil or coconut oil
1/2 to 3/4 to 1 cup packed brown sugar
1/2 cup golden syrup (you can make your own if you can't find it at your specialty grocer)
1/4 cup maple syrup
1/4 cup molasses
1/4 cup honey
1 tsp. vanilla
1 tsp. cinnamon (optional)
1 tsp. orange zest (optional)

Combine oats, flaked coconut, and nuts in bowl and mix well and set aside.

In small saucepan melt, oil, brown sugar, golden syrup, maple syrup, molasses, honey, and cinnamon and bring to boil. Remove from heat and add vanilla. Pour syrup mixture over oatmeal mixture and mix well until incorporated. Spread on parchment lined cookie sheet (you may need two cookie sheets) and bake at 325 degrees for 30 minutes. Stirring every 10 minutes. Remove from oven add dried fruit and orange zest and let cool. Granola will clump as it cools down.

* Use any combination of nuts and/or dried fruit according to individual taste.

Recipe modified to reduce butter and sugar. Enjoy!

Sunday, January 19, 2014

Lemon Ricotta Cheesecake


Lemon Ricotta Cheesecake
My sweet tooth was tugging at me for the past few days. I wanted to cave into my craving however, I did not want to eat anything from a box. Striving to not have to go to store, I searched my fridge, and to my amazement I found that I had all the necessary ingredients to make cheesecake. 

I came across several recipes on the Internet for cheesecake; this is my kitchen tested version.

Graham cracker crust:
8 to 9 Ladyfinger cookies
8 Graham cracker cookies (1 pkg)
2 tbsp. raw cane sugar
3 tbsp. melted butter

Cheesecake:
Pint of low-fat ricotta cheese
1/2 pint goat's milk plain yogurt 
2 (8oz.) Neufchatel cheese, or farmer's cheese (cut into chunks and room temperature)
4 large eggs
3/4 cup raw cane sugar
1/4 tsp. lemon zest
2 - 3  tsp. lemon juice
1 1/2 tsp. vanilla extract
3 tbsp. corn starch
3 tbsp. all purpose flour
1/2 cup butter, melted and cooled

1. Preheat the oven to 350ºF (176ºC). Lightly grease the bottom and sides of a 9-inch spring form pan. And wrap bottom of pan with foil.

2. Combine ladyfingers and graham crackers in food processor until fine, add unbleached cane sugar and melted butter. Pour cookie mixture into your prepared pan and press evenly using the bottom of a glass cup.


3. On medium speed of your electric mixer, combine ricotta cheese until smooth, then add Neufchatel cheese a little at a time, making sure to scrape the sides of mixing bowl periodically until well combined. Add lightly beaten eggs one at a time, scraping sides of bowl after each addition. Next add corn starch, flour, lemon juice,lemon zest, and vanilla extract. Then add sugar a little at a time until desired sweetness. Slowly add butter. Add yogurt until well combined.

Baking  cheesecake in a water bath, helps  reduces the chances the cheesecake will crack, or curdle. Just make sure to wrap the bottom of pan with foil to prevent water from seeping in.
4. Pour batter on top of cookie crust and bake in water bath for about 1 hour until firm to touch and center is soft. Shut off oven, leave cheesecake in oven for one hour. Remove from oven, and let cool for at least one hour at room temperature.

Optional: I like my cheesecakes to have a slightly brown crust so I put the broiler on for a couple of minutes, keep a careful watch as it could burn very quickly.


Serve at room temperature or slightly warm. We couldn't resist and ate the cheesecake while it was warm and it was sooooo good. The softest cheesecake I ever had.

I hope you enjoy it as much as we did.


Friday, January 17, 2014

Introducing Photography as Art and How to Make a Silhouette

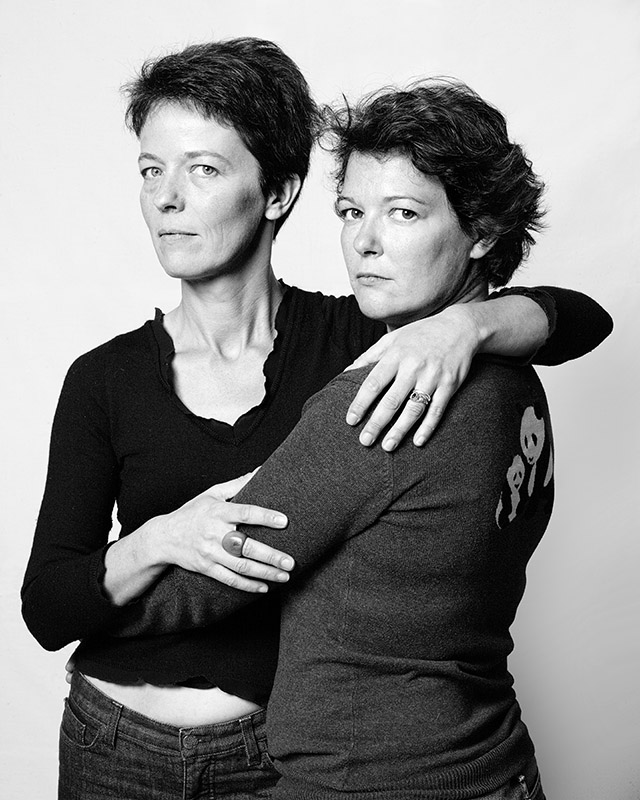
A couple of days ago I stumbled on an article about a Canadian photographer Francois Bruenelle who photographed real-life doppelgangers from around the world. Francois Bruenelle has set out to make two hundred photos of doppelgangers and create an international  exhibit and a book with them titled I'm not a look-alike! So far he has photographed about one hundred.

Elisa Berst and Corinne Barois, photo by  Francois Bruenelle, Paris France 2010

Okay, you may be wondering what in the heck is doppelganger? They are look a-likes or a double of a living person. What is amazing is that he was able to photograph them together. It will also so shock you when you realize that they never met or were related to each other!

Nuno Filipe Mendes Godhino and Miguel Gonçalo Costa Silvestre Francois Bruenelle,  photo by  Lisboa Portugual 2010
 It is fascinating that these people are not related. 
Donmar Williams and  Martine Chase, photo by Francois Bruenelle, Weehaken  U.S.A. 2011

When viewing  Francois Bruenelle's works, I am reminded that art comes in all mediums; children often think about art as something to do with painting. It's good to introduce them to different mediums, one that does not involve paint brushes, watercolor, etc...

Logistics and cost issues may make it difficult to introduce photography as part your Art Masterpiece program. Check around second hand store for used cameras, pick up inexpensive disposable cameras, or if you are lucky get a Polaroid-so they can see instantaneously the results. 

Teach them how to properly hold a camera. Explain camera care. Encourage them to be creative, and photograph whatever subject appeals to them.You can even hold photo contests or hold an exhibition, and invite family and friends.

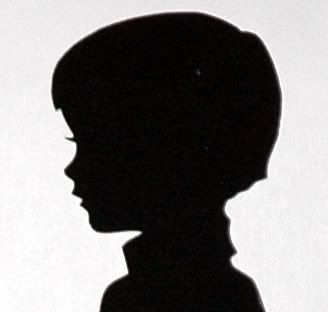
If you do not have a budget to purchase cameras. how about introducing them to the concept of positive and negative images, shadow and light by having students make a silhouette? 


What you will need is...
  • Large sheet white and black (any color will do, however black works best) paper
  • Thumb tacks or masking tape
  • Black crayons
  • Lamp
Tape a piece of white paper on a wall  Set up a light source and ask students to take turns standing between the paper and the light. With a black crayon, follow the outline of the shadow on the paper that is cast from the student. Cut out the figures and trace them onto black paper. Cut out the black figures and glue them onto large pieces of white paper.

They make great gifts; who would you give them to?


Friday, January 10, 2014

How to Paint a Life-sized Chinese Dragon Part I


It's been busy the last couple of days...a nice distraction tho. Here's what I have been up to...

My daughter's charter school mascot is the Mustang, and this year happens to be the year of the horse according the the Chinese zodiac. Since the year of the horse comes around only once every twelve years we will have a celebration marking this special event, which falls on January 31. Our Mandarin teacher, Mrs. Tong will help us put together the celebration.


For the decorations we will create a Chinese Dragon. An important symbol in Chinese culture; and viewed as symbol of power, wisdom and luck. The Chinese dragon has a body of a snake, antlers of a deer, talons of an eagle and scales of a fish. They have no wings, but are able to fly!

To paint a dragon you will need.

Paper (tag paper), the larger the paper the larger your dragon will be.

Paint (Water Color or Tempera) in assorted colors
Tissue paper or construction paper
Scissors


First a row of scalloped line. Your next row starts at the lowest point of the first scallop. Repeat until you have completed the entire page. Don't worry about having the scallops perfect. Hint: The larger your dragon, the large your scales should be. I painted mine with the paper in portrait (vertical), because I will be cutting it half. If you want an extra large dragon you will draw your scallops with the paper in landscape (horizontal).


Outlined in sharpie for viewing, however you will want to do this in pencil.
Next you will paint each scallop, being careful to not have the same color touching each.


When you finish painting it will look like this. You will want to make several of these, the more pages you paint the longer your dragon be. This makes a great group project.


Finally, trim the paper like this:


Flip the paper so you can cut a few sections with the scales in this direction:

If you are making the dragon as a group, don't worry if the scales are not alike or have different colors. I promise, it will still turn out beautiful!

Several students and their parents are helping to paint the dragon in sections. I am off to paint some more!

Stay tuned...

Wednesday, January 8, 2014

Georges Seurat Pointilism with Upcycled Lids

What do you do with your plastic bottle caps and lids? Throwing them out? Well you're not alone, most Americans do. The plastic caps and lids are made from different type of plastic and are not all recyclable. A great way to keep them out of landfills is to incorporate them into art and craft projects. Not only is recycling plastic caps and lids good for the environment, they are free and provide endless possibilities. 

I love using recyclable lids in art projects, students have fun collaborating together and learn how these round caps and lids can integrate sustainability and science with and art. They also make a great visual when students are learning about pointillism. 

Under the Sea Pointillism
Georges Seurat developed the technique of painting in which small, distinct dots or paint strokes of pure color are applied in patterns to form an image, critics later called it called Pointillism.

After a discussion on Georges Seurat and his works, students sorted and glued on plastic caps and lids to create an under the sea pointillism wall art.

Here is another creative use for these lids I found from a fellow blogger +Heather OCain

There are many places you can find free recycled materials for your projects, including asking neighbors or school community. I am fortunate to live by the Art Resource Center (THE ARC), it is a treasure trove for schools and other nonprofits. Their objective is to collect reusable discards from individuals and industries and offer them free of charge to teachers, parent volunteers to use in their projects. They are open by appointment, please let me know if you need information on how to contact them.


I would love to to learn how you incorporate recyclables in your projects.


Tuesday, January 7, 2014

Creating Art with William Wegman's "Weimaraners"

A few weeks ago week I had the opportunity to give an Art Masterpiece presentation in Miss Antonia Rivas' 4th grade class. The Art Masterpiece collection tend to lean towards Euro-centric artists, so I wanted to expose them to an artist that is contemporary.

I often turn to other artists or art teachers for inspiration, +Kathy Barbro is one of them. She previously blogged about William Wegman, an American contemporary artist known for illustrations and photographs of dogs. 

After a brief presentation on his works, students were asked to create their own composition in the style of William Wegman.  Students were given colored pencils, images from magazines, and printed images of dog heads I found on +Kathy Barbro's blog.

Some of the students really got into it and added lots of detail. Here's a few of my favorites.

by Alessandra C.


by Tiamara T.


by Annika M
 Camila L.
Camila G.
by Mi-ae
by Sarah F.
by Ellie B.

William Wegman is a contemporary artist that has illustrated many children’s books and been a part of many videos on "Sesame Street“ and is best known for creating series of photograph compositions involving dogs, primarily his own "Weimaraners" in various costumes and poses.


Didn't they do a great job?

Saturday, January 4, 2014

Clever Storage for Art and School Work

Now that Twenty Fourteen is here, it's time to think about spring cleaning and decluttering paperwork.

If you are like me you have a house divided by paperwork - to save or toss? I save every piece of artwork that comes home. Each piece has a special meaning, some have made it into a frame and hung on the wall, a few have ended up on the refrigerator. Most however, have or will end up in a drawer somewhere. My husband on the other hand never saves a thing, he will look at it once and toss it in the recycling bin.

It does not have to be all or nothing, there are several options for storing paperwork, which are not only esthetically beautiful, but also practical and functionalLike this file box with dividers. Maybe a a box for each child and a file for each grade? 


File box with dividers

What  do you think about storing your child's artwork in these stylish personalized magazine files made to look like book spines?

Magazine file with faux book spine.


How about an archival document box, seems ideal for general document storage, and can be easily stacked away.


Archival document box.


Another idea is to scan or take photos of your child's artwork and create a custom photo book. I think I will do this and purchase double to give as gifts to relatives.
Custom photo book.

What do you do with your child's artwork? Do you display them, save them in a box, or toss them out?